Assignment #7.1: P: Final Prototype
Posted on Wed Jun 12 12:06 AM
Before I show you my final prototype's pictures and product name, I would like to provide you with a bit of generic background in order that the gap and primary needs are understood and everything makes more sense.
My gap (one sentence problem statement)
In what way may I create an artifact that allows me to take better and more immersive video with regular digital cameras while doing action sports (ie. cycling).
List of Main Primary User Needs
- Camera mount is tough (good quality).
- Camera mount is adaptable.
- Camera mount prevents vibration
- Camera mount is inexpensive
- Camera mount looks cool (elegance and beauty).
- Camera mount is tough (good quality).
- Camera mount is adaptable.
- Camera mount prevents vibration
- Camera mount is inexpensive
- Camera mount looks cool (elegance and beauty).
My Product Name
So for my product name I ended up using the composite word technique as shown in the video lectures. I brainstormed some chunks or initial words which later I combined using the lingzini tool, which was also mentioned in the video lectures.
Some of the main words or chunks I used, were:
- Action
- Bike
- Xtreme
- Pro
- Mount
- Camera
- Chest
- Harness
- Velo
- X-
I then combined the words to try to get an interesting brand composite name. The best 3 I selected, were:
- Velomount
- Xest Mount
- Promount
Then, I checked availability on the internet for domain names. Since I live in Colombia, a natural domain should be in the dot CO range. I checked the XEST.CO and it is not yet registered, so I would go with that name if I were to commercialize the artifact. It is the shortest name, it is a mix between Xtreme and Chest, and it could be a good identity for the product. I ran the name with several friends and they liked it as well, so, my name for the artifact is

Final Prototype: Photos, evolution and background
First, a little bit of history so you can see how the concept evolved. In the pictures below you will find couple of experiments and earlier prototypes and sketches of my concept, which is a chest harness where any kind of DSLR camera could be attached. You can click an image to see a larger version if you wish.
 |
| Original concept sketch |
 |
| Early Chest Harness Proof of Concept |
 |
| One of the earliest Chest Harness Prototypes |
 |
| Final Prototype |
As you can see from the pictures, I first wanted to create a proof-of-concept design so I experimented with a borrowed GoPro harness and a lot of zipties, foam and adhesive tape. While the prototype was useful to test the viability of the idea, it didn't look very nice and couldn't fit larger DSLR cameras. For that reason I began trying creating and iterating prototypes to test my concept which better addressed my gap.
So, after many several iterations which involved addressing the key and primary user needs, I finally came out with the final prototypes, for which you will see some photos below.
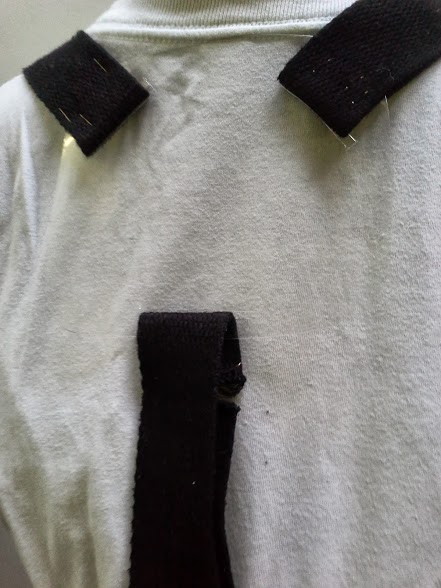
First, I will show the front side of the Final Prototype.


I ended up using a thicker and more resistant fabric belt for the straps. Also, I used an old tripod mount which I attached to the belt. The camera could be easily fastened and mounted in the harness that way. Below you will find the back of the harness and also some more detailed pictures.


After using the prototype last week, I confirm that it does a very good job on addressing all of my primary using needs.
So, after many several iterations which involved addressing the key and primary user needs, I finally came out with the final prototypes, for which you will see some photos below.
First, I will show the front side of the Final Prototype.


I ended up using a thicker and more resistant fabric belt for the straps. Also, I used an old tripod mount which I attached to the belt. The camera could be easily fastened and mounted in the harness that way. Below you will find the back of the harness and also some more detailed pictures.


After using the prototype last week, I confirm that it does a very good job on addressing all of my primary using needs.
Final Prototype Explanation
OK, so from all 10 concepts explored during this course, the Chest Harness mount was the selected one. As you can see from the earlier prototypes, a lot of change have been introduced in the iterations for my artifact. Specifically, I improved the overall quality of the final prototype by using thicker and more durable materials. I also improved the way the DSLR camera was attached to the harness.
Also, I used an old camera mount instead of the metric screw I used before, since it does a better job on fastening the camera to the straps. Another new modification I introduced was the plastic back plate, which improved ergonomics and overall stability. During the last week I also added belt loops so that the belts or straps could be fastened or loosened according to the body constitution of the user. This was the final change introduced.
The camera is very tough, durable, and inexpensive. Overall cost of the product was less than 10 US Dollars, and it could be even less (I bought the materials at a quite expensive specialised store).
I used the alpha prototype a lot throughout this last week to fine tune it and better understand possible improvements.
After plenty of use I find that my prototype is very usable and stable. My main concern at the moment is to improve the stitches made to the belt, perhaps by use a sewing machine and better thread. Also, the straps could be improved and some padding could be included in the prototype to improve overall comfort. Other than that, I'm very happy to have a new artifact which I could use and truly close a gap I've been having!!!
Also, I used an old camera mount instead of the metric screw I used before, since it does a better job on fastening the camera to the straps. Another new modification I introduced was the plastic back plate, which improved ergonomics and overall stability. During the last week I also added belt loops so that the belts or straps could be fastened or loosened according to the body constitution of the user. This was the final change introduced.
The camera is very tough, durable, and inexpensive. Overall cost of the product was less than 10 US Dollars, and it could be even less (I bought the materials at a quite expensive specialised store).
Next steps required to further refine the artifact
After plenty of use I find that my prototype is very usable and stable. My main concern at the moment is to improve the stitches made to the belt, perhaps by use a sewing machine and better thread. Also, the straps could be improved and some padding could be included in the prototype to improve overall comfort. Other than that, I'm very happy to have a new artifact which I could use and truly close a gap I've been having!!!
No comments:
Post a Comment